Load Done Away Window
Neovest's "Load Done Away" window lets you automatically create positions in your Neovest account by letting you import files that contain orders that you have executed outside of Neovest.
1. In order for a file containing trade data to be imported successfully into a Neovest Account+ window, the file must be formatted correctly, according to the
following specifications:
The first row of the file may be used for your personal mapping purposes and may
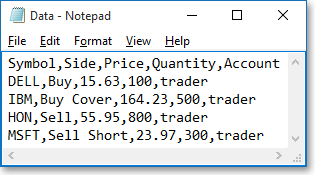
contain the following fields: Account, Account Type, Blotter Code, Call/Put, Clear, Commission Amount, Commission Type, Currency, Date, Destination, Exchange, Exp Month, OATS, Price, Quantity, RefID, Side, Strike Price, Symbol, and Underlier (case is not important). Neovest
will not recognize any fields other than these specified.
2. All fields must be separated by a comma, semicolon, space, or tab in a plain text document—or all fields must be separated in individual cells in a spreadsheet
and then saved in a comma-, space-, or tab-delimited format.
Note: The order of the fields is not important; however, it is important that you separate the trade information that you wish to import into columns of the same data. For instance, all symbols should be organized into one column, all prices should be organized into a separate column, and so on. If you choose to import a commission amount, you must also specify a Commission Type of either "Flat" or "CPS."
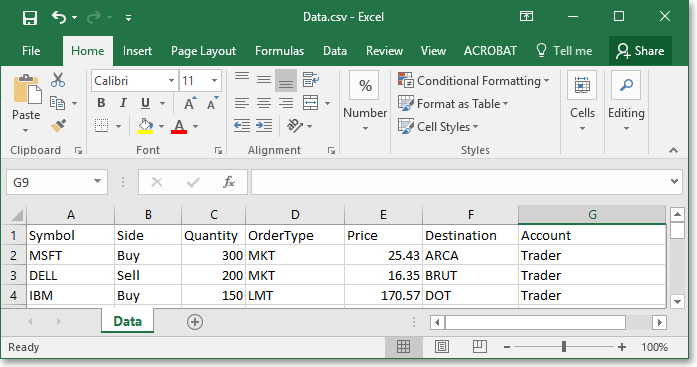
3. Two examples of proper field formatting are as follows:
The following instructions explain how you may automatically create positions in your Neovest account by letting you import files that contain pre-executed orders:
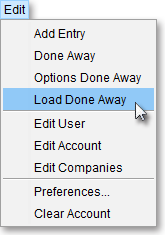
Click Edit on an open Neovest Account+ window.
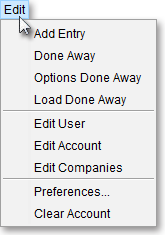
Select Load Done Away.
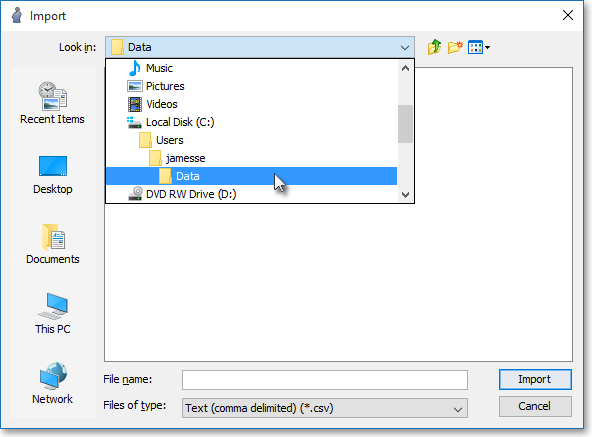
Once the "Import" box appears, click on the "Look In" down arrow to select the location of the file that you wish to import.
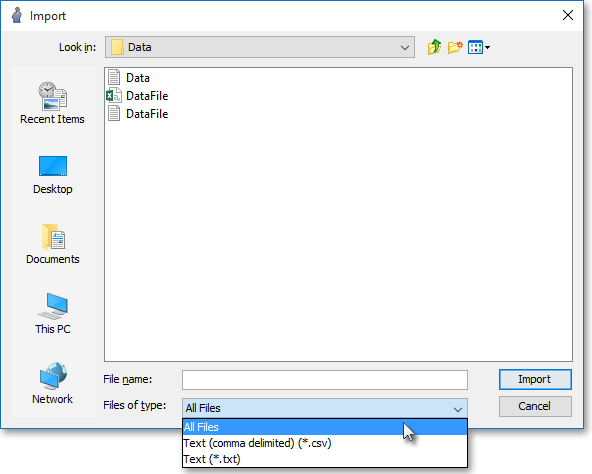
Note: If you are unable to locate the file that you wish to import, you may need to click on the "Files of Type" down arrow and select "All Files." The "Files of Type" drop-down menu lets you control which files are displayed in the "Import" box. Selections in the "Files of Type" drop-down menu range from letting you display "All Files (*.*)" to certain "Text" files with various extensions.
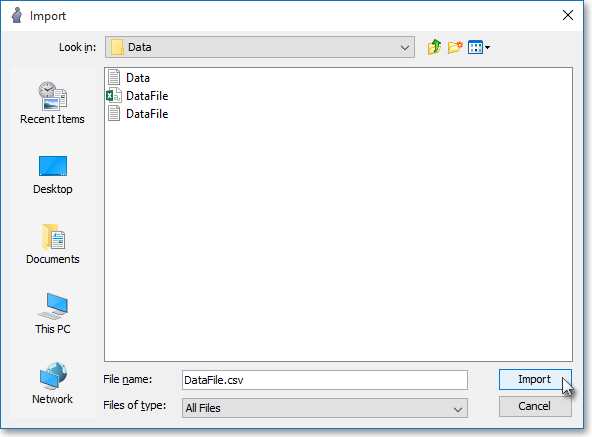
Once you click on the file that you wish to import, click Import.
Once the "Import Table" box appears, you may configure the file containing trade data that you wish to import into a Neovest Account+ window.
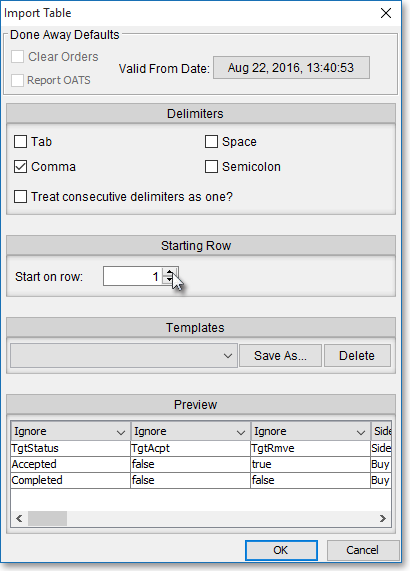
The following table provides descriptions of the features in the "Import Table" box:
| Feature: | Description: |
| Delimiters | Lets you specify the delimiter that you have chosen for the file containing trade data that you wish to import into an Account+ window. For instance, if you have saved the file in a comma-delimited format, then you would check "Comma" in this field. If you have saved the file in a semicolon-, space-, or tab-delimited format, then you may check the selection in this field that is appropriate for your chosen delimiter. If your saved file containing trade data includes multiple delimiters in a row without any trade information in between the consecutive delimiters, then you may select "Treat Consecutive Delimiters As One" and Neovest will recognize only one delimiter instead of the multiple delimiters that appear in consecutive order. If, however, you have intentionally left certain trade information fields blank for personal mapping purposes and, therefore, you have purposely created one or more rows of consecutive delimiters without any trade information in between the consecutive delimiters, then you would not want to select "Treat Consecutive Delimiters As One." Once you select a delimiter for the file containing trade data that you wish to import into an Account+ window, Neovest will separate the trade information into columns in the "Preview" field in the "Import Table" box. Once the trade information is separated into columns, you may specify a category header for each column by clicking on the down-arrow above each column. For instance, you may select "Symbol" for the column that is made up of symbols, "Prices" for the column that is made up of average prices, and so on. |
| Starting Row | Lets you select the starting row for the file containing trade data that you wish to import into an Account+ window. For instance, if the file you wish to import has several lines of trade information and you wish to ignore the first row of information in the file (since Neovest does not recognize actual Account+ window-type words such as "Side," "Quantity," and so on), then you may click on the "Start on Row" up-arrow to change the default of "1" to a "2" to ignore your first row of personal mapping information. |
| Templates | Lets you select, save, and delete templates that you have created in the "Preview" field in the "Import Table" box. A "Template" is referred to in Neovest as the row of category headers that you have specified for the columns of trade information that you wish to import into an Account+ window. For instance, once you have chosen a delimiter for the file containing trade data that you wish to import into an Account+ window and Neovest has separated the trade information into columns in the "Preview" field in the "Import Table" box—you must specify a category header for each column (i.e., "Symbol" for the column that is made up of symbols, "Prices" for the column that is made up of average prices, and so on). If you have multiple files that you wish to import into an Account+ window and the trade information is in the same order in each file—then you may save the template that you have created for the first file to use in consecutive files that you wish to import into an Account+ window. |
| Preview | Lets you preview the trade information that you wish to import into an Account+ window. Once you select a delimiter for the file containing trade data, Neovest will separate the trade information into columns in the "Preview" field in the "Import Table" box. Once the trade information is separated into columns, you may specify a category header for each column by clicking on the down-arrows above each column. For instance, you may select "Symbol" for the column that is made up of symbols, "Prices" for the column that is made up of average prices, and so on. |
Once you have configured the file containing trade data that you wish to import into a Neovest Account+ window, click OK.
