Editing an Existing Liquidity Slicing Strategy in an Order Entry Montage Window
Neovest lets you edit an existing liquidity slicing strategy from an Order Entry Montage window. In order for you to edit an existing strategy, the liquidity slicing strategy drop-down menu must be displayed in an Order Entry Montage window.
The following instructions explain how you may edit an existing liquidity slicing strategy from an Order Entry Montage window via the liquidity slicing strategy drop-down menu:
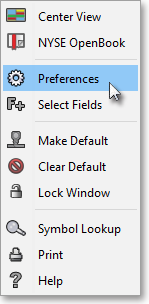
With an Order Entry Montage window open on your screen, click the gear icon, located on the far-right of the toolbar.

Click the "Preferences" icon on the drop-down menu that appears.
Once the "Montage Preferences" box appears, select the "Actions" tab.
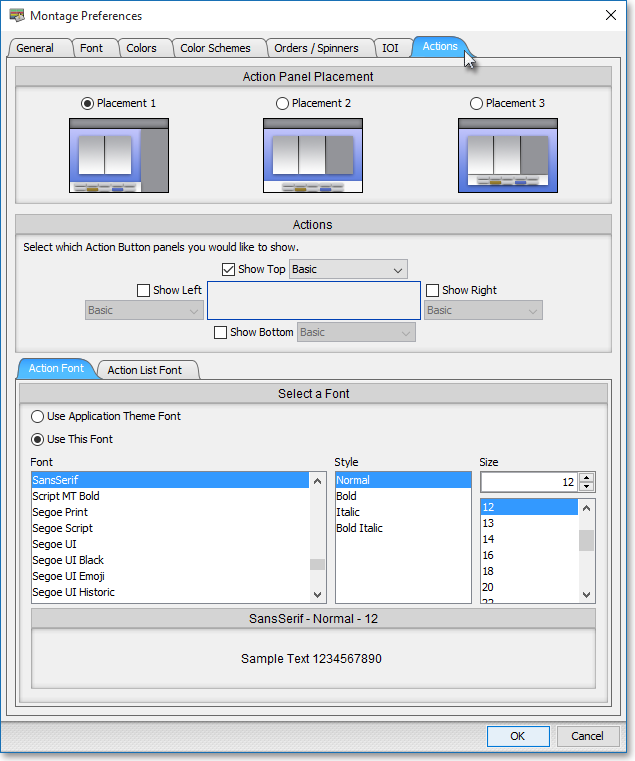
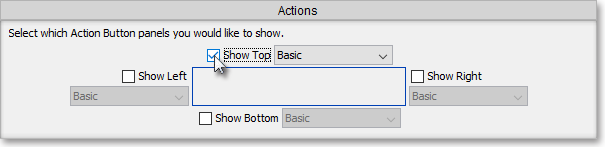
Click in the square to the left of "Show Top," "Show Left," "Show Bottom," or "Show Right" to add an Action Button panel to the location you wish in the market maker, ECN, and regional exchange section in an Order Entry Montage window, which in turn will cause the liquidity slicing strategy drop-down menu to appear on one of the panels.
Click OK.

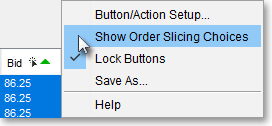
Note: At this point, the liquidity slicing strategy drop-down menu should be displayed on an Action Button panel you just added to the market maker, ECN, and regional exchange section in an Order Entry Montage window. If the liquidity slicing strategy drop-down menu is not displayed, simply click with the right mouse button on the Action Button panel, and select Show Order Slicing Choices to cause the drop-down menu to appear.
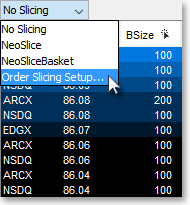
Click on the liquidity slicing strategy drop-down menu down arrow to access its list of available features.
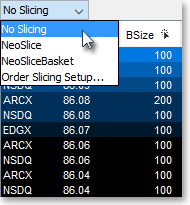
Select Order Slicing Setup from the menu that appears.
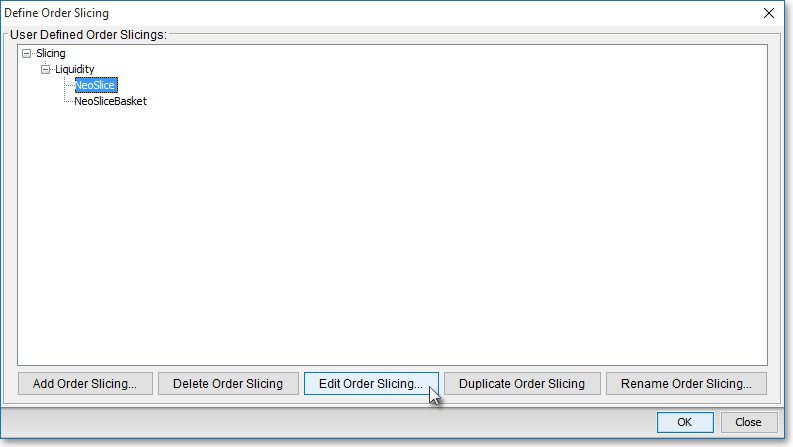
Once the "Define Order Slicing" box appears, select the liquidity slicing strategy you wish to edit.
Note: In the following graphic, "NeoSliceBasket" is used as the example.
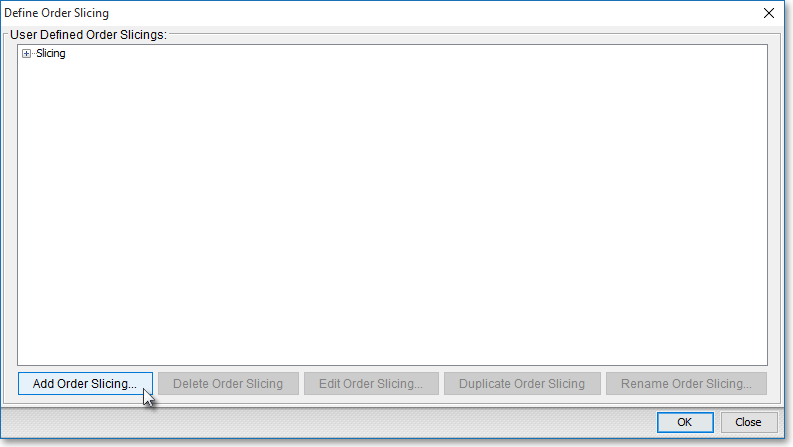
Once you select the liquidity slicing strategy you wish to edit, click Edit Order Slicing.
Once the "Liquidity Order Slicing Setup" box appears, edit the criteria that you wish Neovest's Strategy Server to use to slice your large parent orders into multiple smaller child orders.
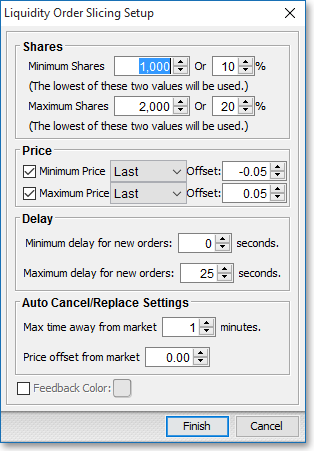
The following table provides descriptions of the features in Neovest's "Liquidity Order Slicing Setup" box:
| Feature: | Description: |
| Shares | Lets you edit the minimum and maximum share sizes and percentages for each child order. Once you specify the minimum and maximum share values you wish, Neovest will use the values to automatically generate random sizes for your child orders between your minimum and maximum range. |
| Price | Lets you edit the minimum and maximum price parameters for each child order. Once you specify the minimum and maximum price values you wish, Neovest will verify that each automatically generated child order's price falls within your minimum and maximum price range before it is sent. You may choose via this feature's drop-down menus to use a particular symbol's "Bid," "Ask," "Last," or "Mid Price" price as the price criteria, and you may also specify a positive or negative price offset. In addition, you must check mark the check boxes to the left of "Minimum Price" and "Maximum Price" to cause Neovest to continuously verify that each child order meets your minimum and maximum price range requirements. If the check boxes aren't checked, then Neovest will continue to send child orders, regardless of the prices of the child orders, until a particular entire parent order is filled. Note: Once you set up a particular liquidity slicing strategy, select it, and click on an Action Button in a Neovest Order Entry Montage window—Neovest's Strategy Server will begin to utilize the liquidity slicing strategy criteria you specified to slice your parent order, which was generated by you clicking on the Action Button. As part of each child order's creation process, Neovest will use multiple criteria—including the default price and offset values you entered during the set up process of the order action that you assigned to the particular Action Button upon which you clicked—to determine the price of each child order. For more information regarding how Neovest determines prices for each of your child orders, refer to the "How Neovest Determines Each Child Order's Price" section in the "Liquidity Slicing Strategy" section in the Order Entry Montage chapter of Neovest's Help documentation. |
| Delay | Lets you edit minimum and maximum time delays that Neovest will use to determine random pauses between the sending of each child order. |
| Auto Cancel/ Replace Settings |
Lets you edit automatic cancel and replace time and price settings for each child order. Once you specify the time and price values you wish, Neovest will automatically allow you to cancel or replace each sent child order that has not been filled after your specified amount of time and is more than your specified price away from the current market price. |
| Feedback Color | Lets you edit a feedback color for the Action Button panels in the market maker, ECN, and regional exchange section in an Order Entry Montage window. If you wish to specify a color, first check the check box to the left of Feedback Color and then click on the colored square to the right of Feedback Color. Once you click on the colored square, the "Choose a Color" box will appear. The "Choose a Color" box contains three tabs: "Swatches," "HSB," and "RGB." The "Swatches" tab lets you select one of several color "swatches" to replace the existing color of the Action Button panel. The "HSB" and "RGB" tabs let you edit the color of the selected swatch. If at any time you do not like the color of the swatch you selected or you do not like the color changes you have made to the swatch itself, click Reset to return to the existing color. Once you select a color to replace the existing color of the Action Button panel, click OK. |
Click Finish to apply and save the changes.

Once the "Define Order Slicing" box appears, select the liquidity slicing strategy you just edited, or choose an alternate strategy.
The following table provides descriptions of the remaining features in the "Define Order Slicing" box:
Feature: |
Description: |
| Add Order Slicing | Lets you create a new liquidity slicing strategy by letting you give the new strategy a name in the "Create New Order Slicing Strategy" box and by letting you define its criteria in the "Liquidity Order Slicing Setup" box. |
| Delete Order Slicing | Lets you delete a selected liquidity slicing strategy. This feature only becomes active after you have clicked on an existing strategy and highlighted it in the "User Defined Order Slicings" field. |
| Edit Order Slicing | Lets you edit the criteria of an existing liquidity slicing strategy. Once you click on this feature, the "Liquidity Order Slicing Setup" box will appear. This feature only becomes active after you have clicked on an existing strategy and highlighted it in the "User Defined Order Slicings" field. |
| Duplicate Order Slicing | Duplicates a selected liquidity slicing strategy. This feature is useful if you wish to create a new liquidity slicing strategy based off of the original, with only minor changes. Once you click on this feature, you may then click Edit Order Slicing to change the criteria of the duplicate strategy. This feature only becomes active after you have clicked on an existing strategy and highlighted it in the "User Defined Order Slicings" field. |
| Rename Order Slicing | Lets you rename a selected existing liquidity slicing strategy. This feature only becomes active after you have clicked on an existing strategy and highlighted it in the "User Defined Order Slicings" field. |
Once you have finished making the changes you wish in the "Define Order Slicing" box, click OK
Note: Any modifications you choose to make to an existing liquidity slicing strategy will be applied to the strategy as it appears in any Neovest Basket, Montage, and Order Entry Montage window.