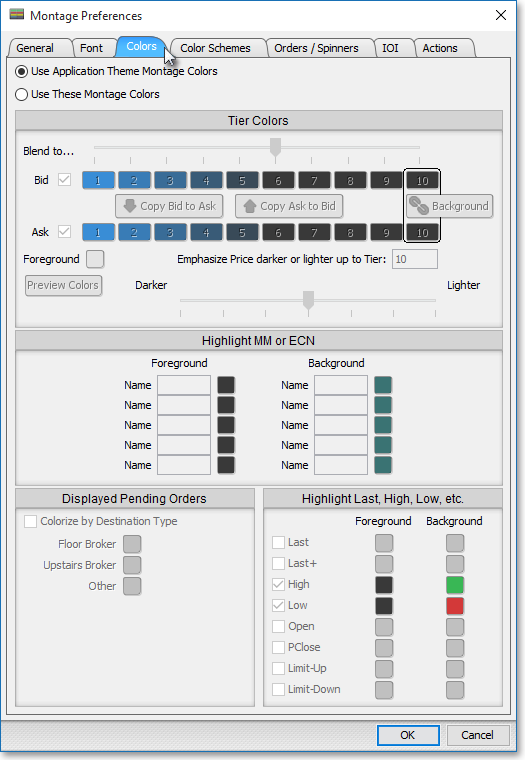
Colors Tab
Features in the "Colors" tab in Neovest's "Montage Preferences" box let you choose up to 10 different colors for the first 10 market depth levels in an OE Montage window. You may also choose to specify a number of tiers to display a gradient color of the initial color you choose for level one.
Additional features in the "Colors" tab let you (1) specify individual market makers and ECNs to be highlighted with specific colors, (2) colorize different types of pending orders depending on each pending order's destination type (i.e., "Floor Broker," "Upstairs Broker," and "Other"), and (3) select foreground and background colors for certain display fields in a Neovest OE Montage window.
The following instructions explain how you may change the colorization of the first 10 market depth levels in a Neovest OE Montage window:
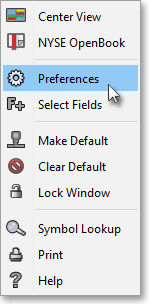
With a Montage window open on your screen, click the gear icon, located on the far-right of the toolbar.

Click the "Preferences" icon on the drop-down menu that appears.
Once the "Montage Preferences" box appears, select the "Colors" tab.
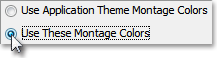
Select the "Use These Montage Colors" toggle button.
Note: For more information regarding the "Use These Montage Colors" toggle button, refer to the "Montage Colors Tab" section of the "Menu" chapter in Neovest'sHelp documentation.
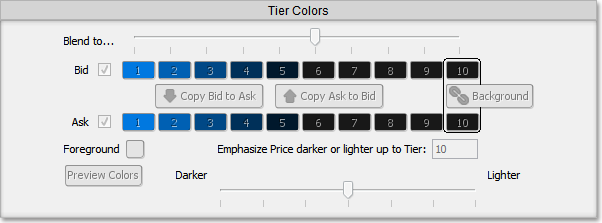
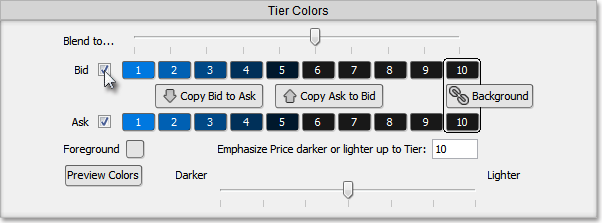
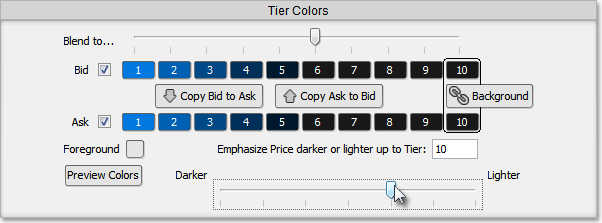
In the "Tier Colors" section, click on the number associated with the tier whose color you wish to change. For example, if you wish to change the color of the first tier, simply click "1."
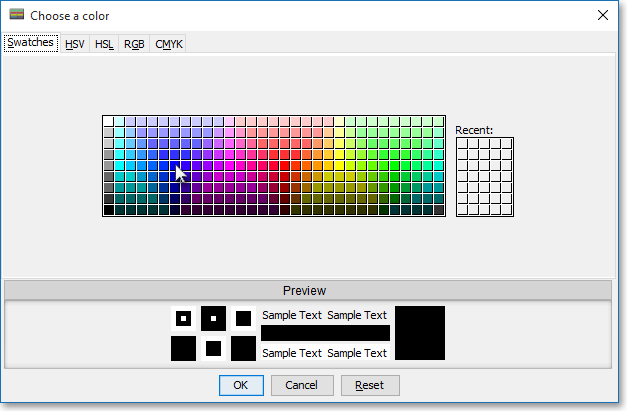
Note: Once you click on a number associated with a tier, the "Choose a Color" box will appear. The "Choose a Color" box contains five tabs: "Swatches," "HSV," "HSL," "RGB," and "CMYK." The "Swatches" tab lets you select one of several color "swatches" to replace the existing component color of the selected color scheme. The "HSV," "HSL," "RGB," and "CMYK" tabs let you edit the color of the selected swatch. If at any time you do not like the color of the swatch you selected or you do not like the color changes you have made to the swatch itself, click Reset to return to the existing component color of the selected color scheme. Once you have selected a replacement color, click OK.
Once you select a color to replace the existing color of the selected tier, click OK.

Note (1): You may continue changing the colors of the remaining tiers you wish by following the preceding instructions. However, you may cause Neovest to change your tier colors for you. Simply choose the color you wish for Bid Tier 1 or Ask Tier 1 by following the preceding instructions, then check the box to the right of Bid or Ask, and Neovest will choose a gradient color of your selected Tier 1 color for each of your remaining tiers.
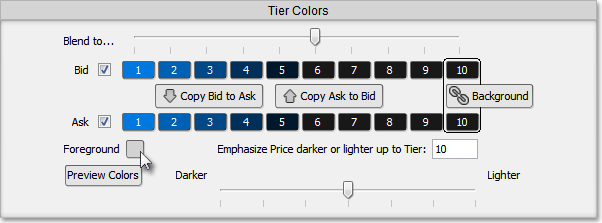
Note (2): You may also choose a different Foreground color by clicking on its square and making your selection. This will change the text and data color within the market depth levels.
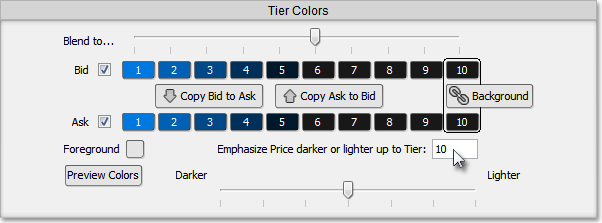
Note (3): If you wish the gradient colors based off the color you selected for Tier 1 to end at a certain tier instead of extending all the way to Tier 10, then you may specify at which tier you wish the gradient colors to end. Simply enter the tier number where you wish the gradient colors to end in the "Emphasize Price Darker or Lighter Up To Tier" box, and press Enter.
Note (4): Lastly, if you wish the bid, ask, and price data to appear lighter or darker in the market depth levels, simply move the darkening and lightening indicator.
Once you make the colorization changes to the first 10 market depth levels you wish, click OK.
The following instructions explain how you may specify individual market makers or ECNs to be highlighted with specific colors in a Neovest Montage window:
With a Montage window open on your screen, click the gear icon, located on the far-right of the toolbar.
Click the "Preferences" icon on the drop-down menu that appears.
Once the "Montage Preferences" box appears, select the "Colors" tab.
Enter the market maker or ECN that you wish to be highlighted with a specific color in the Montage window.
Note: If you wish to enter a market maker or ECN in connection with this feature, the correct market maker or ECN identifier must be entered exactly as it will appear in a Neovest Montage window. For example, "ARCA," "INET," "NYSE," etc.
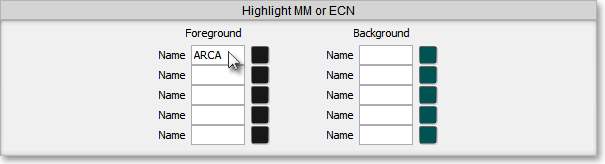
Click on the square to the right of a market maker or ECN to select the highlighting color.
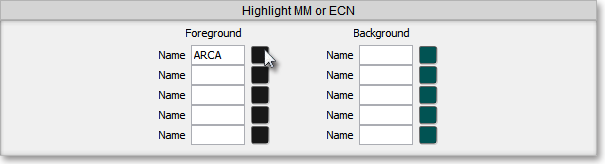
Note: Once you click on a colored square to the right of a market maker or ECN, the "Choose a Color" box will appear. The "Choose a Color" box contains five tabs: "Swatches," "HSV," "HSL," "RGB," and "CMYK." The "Swatches" tab lets you select one of several color "swatches" to replace the existing component color of the selected color scheme. The "HSV," "HSL," "RGB," and "CMYK" tabs let you edit the color of the selected swatch. If at any time you do not like the color of the swatch you selected or you do not like the color changes you have made to the swatch itself, click Reset to return to the existing component color of the selected color scheme. Once you have selected a replacement color, click OK.
Once you select a color to use as the highlighting color, click OK.
The following instructions explain how you may colorize different types of pending orders in a Neovest Montage window depending on each pending order's destination type:
With a Montage window open on your screen, click the gear icon, located on the far-right of the toolbar.
Click the "Preferences" icon on the drop-down menu that appears.
Once the "Montage Preferences" box appears, select the "Colors" tab.
Click in the box to the left of "Colorize by Destination Type" to place a check mark in the box and thus activate the three destination types for which you may specify a color.

Click on the square to the right of the destination type for which you would like to specify a color. For example, if you wish to specify a color for all pending orders that have been sent to a floor broker, simply click on the square to the right of "Floor Broker."
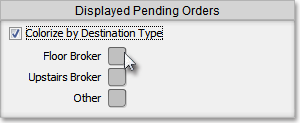
Note: Once you click on a colored square to the right of a destination type, the "Choose a Color" box will appear. The "Choose a Color" box contains five tabs: "Swatches," "HSV," "HSL," "RGB," and "CMYK." The "Swatches" tab lets you select one of several color "swatches" to replace the existing component color of the selected color scheme. The "HSV," "HSL," "RGB," and "CMYK" tabs let you edit the color of the selected swatch. If at any time you do not like the color of the swatch you selected or you do not like the color changes you have made to the swatch itself, click Reset to return to the existing component color of the selected color scheme. Once you have selected a replacement color, click OK.
Once you select a color to replace the existing color of the selected destination type, click OK.
Note: Once you finish selecting colors for your pending orders based on their destination type, you must make sure that the "Show Orders in Montage" feature is checked in the "Spinner" tab in the "Montage Preferences" box for the Montage window. Once you ensure that the "Show Orders in Montage" feature is checked, then your colorized pending orders will appear in the market maker, ECN, and regional exchange section in the Neovest Montage window. For more information regarding the "Spinner" tab, refer to the "Spinner Tab" section in the "Montage" chapter in Neovest's Help documentation.
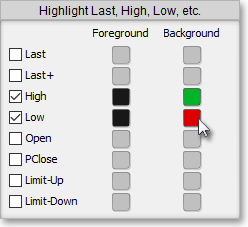
The following instructions explain how you may select foreground and background colors for certain display fields in a Neovest Montage window:
With a Montage window open on your screen, click the gear icon, located on the far-right of the toolbar.
Click the "Preferences" icon on the drop-down menu that appears.
Once the "Montage Preferences" box appears, select the "Colors" tab.
Click in the box to the left of "Last," "Last+," "High," and so on to place a check mark in the box and thus activate the data associated with a particular display field to begin displaying the foreground and background colors you will specify.
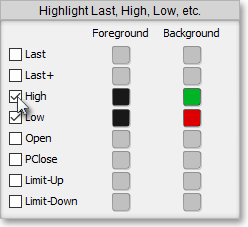
Click on the "Foreground" or "Background" square to the right of the display field for which you would like to specify text and highlight colors. For example, if you wish to specify a highlight color for the "Low" display field, simply click on the square to the right of "Low" under the "Background" column.
Note: Once you click on a "Foreground" or "Background" square to the right of a display field, the "Choose a Color" box will appear. The "Choose a Color" box contains five tabs: "Swatches," "HSV," "HSL," "RGB," and "CMYK." The "Swatches" tab lets you select one of several color "swatches" to replace the existing component color of the selected color scheme. The "HSV," "HSL," "RGB," and "CMYK" tabs let you edit the color of the selected swatch. If at any time you do not like the color of the swatch you selected or you do not like the color changes you have made to the swatch itself, click Reset to return to the existing component color of the selected color scheme. Once you have selected a replacement color, click OK.
Once you select the foreground and background colors you wish for a particular display field, click OK.